You can view Taiga Tribe as an extension to Taiga, which you can use to find external help for your project but also as an independent tool, which you can use to hire the right people to work on a specific task for any of your projects, not necessarily Taiga related.
In this article, we try to give a quick overview of the most important features of Taiga Tribe,with a focus on creating and managing a gig.
Let’s assume that your team simply cannot deal in due time with a User Story on your Taiga project. A quick, easy and convenient solution is to publish that User Story as a gig on Taiga Tribe and hire people interested, and with the necessary knowledge, to work on your gig – they would be the “gigsters”.
In short, the basic process would be:
- You publish a gig on Taiga Tribe.
- Gigsters apply to work on that gig – by doing this, the gig owner is automatically added to the gigster’s Contacts list.
- You select the gigster that is the best fit to perform the work you need.
- The gigster you select accepts – the gigster has to provide a Paypal account, if one has not been added to their profile yet.
- You start the work after you pay the fee via Paypal – the only payment platform supported so far at the time of this article.
- You get in touch with the gigster if you need to communicate something.
- The gigster marks the gig as complete, you confirm and the gigster gets paid.
You can access the My gigs page to view all the gigs you have published (ongoing or closed).
Creating a gig
You can create a gig on Taiga Tribe:
- from the details page of a User Story – for more details, you can go to Publish as Gig in Taiga Tribe
- directly from Taiga Tribe after you login – you can login with your Taiga credentials (you can go here to see details about publishing a gig)
Linking a gig
To link a gig you create directly from Taiga Tribe to a User Story on a Taiga project:
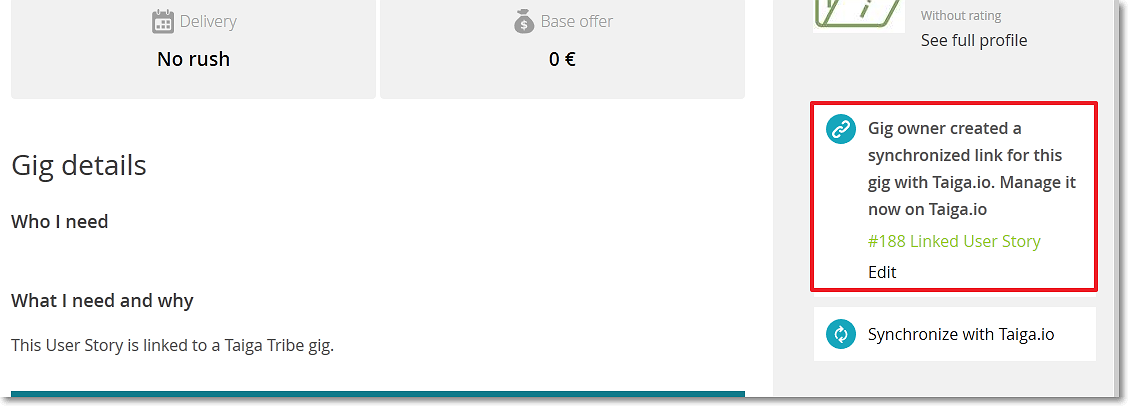
- On that gig’s details page, click MANAGE THIS GIG WITH TAIGA.IO – this action opens the Manage job with Taiga page.
- On the Manage job with Taiga page you can:
- link that gig to an existing User Story on your Taiga project
- create a new User Story on your project that will be linked to that gig
- create a whole new Taiga project with a new User Story to manage that gig
Note: If you already own a private Taiga project, then you can only create a new public project or you can update your Taiga pricing plan.
Both the gig owner and the gigster can link a gig to a User Story on a Taiga project. If both do so, then both linked User Stories are displayed on that gig’s details page.
When you publish a gig from the details page of a User Story, the gig and the User Story are automatically linked. Of course, they can be unlinked from the Edit gig management page – you can see how to access this page in the following sections of this article
Other actions you can take on a gig’s details page
Before you publish a gig you have just created, there are several actions you can take on its details page.
Note: To access a gig’s details page, on the My gigs page, click that gig’s name.
Edit gig settings
To edit the gig’s settings, next to its name, click  – this action opens the edit page.
Change the way you manage the gig
To access the Edit gig management page, under the number and subject of the linked User Story, click Edit.
On the Edit gig management page, you can:
- select another User Story from the same Taiga project to manage the gig
- select another Taiga project or create a new Taiga project to manage the gig
- simply unlink the gig from its Taiga User Story – you can link them again at any time
- choose who can see the User Story linked to the gig – you can allow the gigster that works on the gig to view the User Story that is linked to the gig
Sync with Taiga
Up until the moment you select a gigster (right before the work starts), you can sync data back and forth between the gig on Taiga Tribe and the User Story on the Taiga project that is linked to it.
To get data from the User Story, on the gig’s details page, click Synchronize with Taiga.io.
After the work starts, you can only sync data from the gig towards the User Story, but not from the User Story towards the gig.
Actions after a gig is published
After you publish a gig, you can click its name to access the details page. Depending on the current stage the gig is in, there are several actions available for you (as the owner) and for a gigster.
Invite gigsters
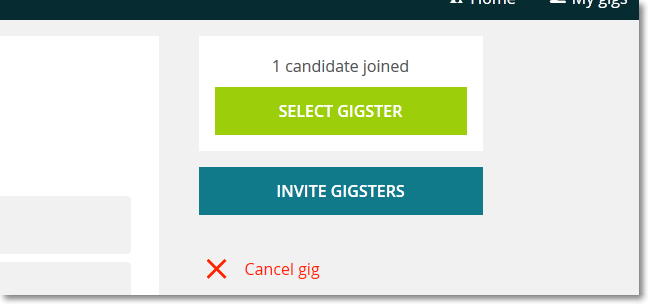
You can invite gigsters to apply – to do this, click INVITE GIGSTERS.
Select gigster
If gigsters apply to work for your gig, you can click SELECT GIGSTER to view a list with all applicants and select a gigster.
Start working
Once the selected gigster accepts the gig, you have to click START WORKING to first pay the fee to Taiga Tribe via Paypal and then get in contact with the gigster to proceed with the work.
Before you pay the fee, you can always select another gigster.
Communicate
Communication between you and the gigster can be done via the integrated messaging feature of Taiga Tribe.
Cancel gig
As a gig owner or as a gigster, you can cancel a gig at any time.
If, as a gig owner, you cancel the gig before work starts, you do not have to give a reason for cancelling, however, you do have the option to send a message to gigsters that may have applied.
To cancel a gig after work has started, as a gig owner or as a gigster, on the My Gigs page you have to click Cancel gig and give a reason for cancelling (for the Taiga Tribe team and for the gig owner or gigster).
After a gig is cancelled, it is considered closed and marked accordingly.
Accept the work
As a gigster, after being selected, you have to ACCEPT THE GIG if you want to continue – the gig owner will be able to start the work.
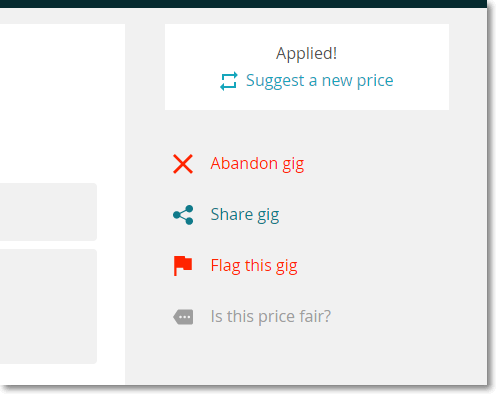
Suggest another price
Gigsters (even if they have not applied for the gig) can suggest another fixed price – Suggest a new price, or suggest a range – Is this price fair?.
Abandon gig
As a gigster, if you do not wish to continue, you can abandon a gig before work starts, without giving a reason. To do this, click Abandon gig.
Alternatively, to abandon a gig before work starts, on the My Gigs page you can click Abandon (or Cancel right before you would accept the gig).
Note: The Abandon gig link is no longer available after work starts.
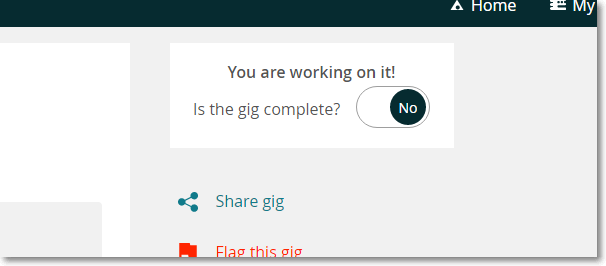
Flag gig
Gigsters can click Flag this gig to signal that there is something wrong with a gig.
Share gig
Anyone can click Share gig in order to share a gig on social networks.
Mark as complete
When work is done, the gigster marks the gig as complete and you will have to confirm. By confirming you will pay the gigster for all the work – the User Story linked to the gig can now be closed and your project is one step closer to completion.
So, what else is there…?
Taiga Tribe comes with other great features that will look familiar if you are already accustomed to Taiga.
When you access Taiga Tribe and login, you will see your “homepage”, with the menu bar on the top side and under it, a list with gigs recommended for you.
From the top menu bar, you can click the All gigs or All gigsters links to view all available gigs or all gigsters, or you can use the search box to find a specific gig or a gigster.
In addition, from the top menu bar, you can access your profile page or your account settings page.

To access your profile page, on the top menu bar, position your pointer over your Taiga Tribe username and then, from the drop-down menu, select Edit Profile.
On the profile page, you can add or edit personal details as well as professional details.
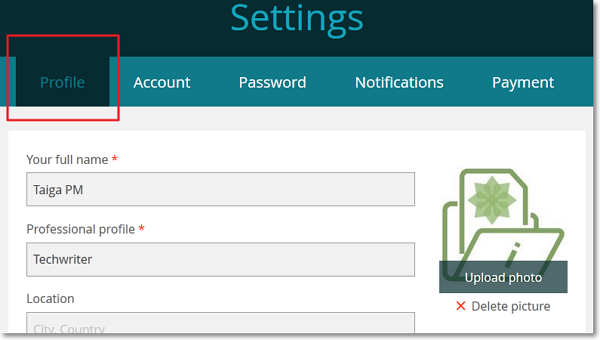
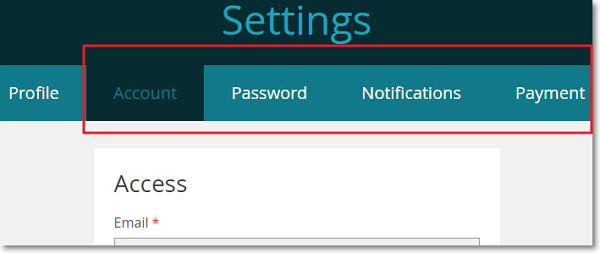
To access your account settings page, on the top menu bar, position your pointer over your Taiga Tribe username and then, from the drop-down menu, select Settings.
On the account settings page, you can edit your e-mail address and your Taiga Tribe username or you can cancel your Taiga Tribe account.
Other settings you can edit are:
- your password
- the notifications you receive
- your PayPal account e-mail